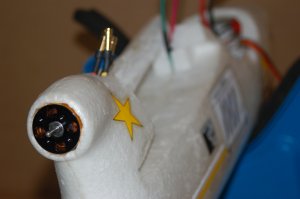


There is something about models and making changes to them that motivates many modelers. I tend to think about it like the Tim Allen “more power” attitude on the popular past TV show. On the E Zone internet discussion group there are huge numbers of comments on upgrades to the Easy Star. So… why not?
The upgrade components to my Easy Star included a brushless motor and corresponding speed controller. The motor I chose was the HXT 2835 (380S) 2700kv Brushless Inrunner and the hexTronik PRO 36A BESC, both from Hobby City. I used a prop adapter and APC 5.5 X 4.5 prop powered by one of my 2100 mAh 3-cell lipos.
I looked at a couple of ways to wire the motor into the Easy Star. I’ve seen a couple of folks who mounted the ESC on the outside of the motor nacelle or above the wings. That’s probably a good plan especially in terms of cooling airflow. However, I like smooth lines and hanging stuff off the outside of the aircraft isn’t my favorite technique. That said, the plan was to slide the motor into the nacelle and run the wires through the fuselage to an ESC in the cockpit area.
After taking a look at snaking wires through the existing channels it became clear that wasn’t going to work. My RTF Easy Star like many RTF Multiplex aircraft was stuck together with double stick tape. That made it fairly easy to break the seal from the front of the motor nacelle to the cockpit. As shown in the photo, I cut the right side fuselage just forward of the nacelle and just behind the cockpit. The result opened the area above the wing. Using a sanding drum on my rotary tool I carved an enlarged channel for the three wires going to the motor and after testing the motor including the rotation direction, the fuselage was reclosed using CA and some kicker. From the outside, the only visible difference from my stock Easy Star is the different spinner and prop.
Doing the measures I discovered that the weight of the heavier motor and battery added 2 ounces to the gross weight. The vital statistics were as follows:

| Wingspan | 54 inches |
| Fuselage | 36 inches |
| Weight | 26 ounces |
| Battery | 11.1v 2100mAh |
| Motor | HXT 2835 2700kV |
| Watts | 180 |
| Amps | 20,4 |
| Prop | APC 5.5X4.5 |
The last modification was a block to keep the battery in place. When I put the battery in the nose where the smaller stock battery had gone, the plane was significantly nose heavy. After putting the receiver in the nose I was able to get a good CG with the battery forward of the aft bulkhead. I used a scrap piece of foam and some hook and loop tape to put a stop at the rear of the cockpit area to keep the battery at the balance point and not sliding aft during acceleration. Since the block was velcroed in, if I change batteries, I’ll be able to adjust the fore/aft spacing. Since I use my batteries in several different models, I wasn’t interested in mounting the Velcro to the battery, itself.
Airborne, the Easy Star has the same gentle characteristics of the stock model when gliding and at low power settings. With the throttles up high, well, that’s another story. The brushless Easy Star is ready to jump into the air at launch. In fact, I’ve found that a half throttle launch is more controllable. With full power it really screams. The climb to an altitude of 300 feet or so occurs at an 80 degree angle and takes less than 10 seconds. The model can easily loop from level flight. A pass down the runway is 3 to 4 times faster than the stock model’s ambling along. I’ve also noticed a visible flex to the wings when pulling some Gs. Here is a before and after video. It begins with the stock brushed motor and ends with the brushless set-up.
Overall, I think the upgrade to the Easy Star will keep it in my favorite to fly category a good while longer. It is still the gentle pseudo-glider with a low or no throttle setting now with the ability to race back to altitude to start the gentle glide back down.


